It's about that time. As we approach August, I am excited and nervous all at the same time. I realize that not only is my oldest starting Kindergarten, but so am I...we are beginning a homeschool journey that seems a little strange and thrilling to me and I think a little of the same for my child, too.
So, I was contemplating this homeschool journey and thinking about blogging it here, but I really think, rather than go on and on about that, I will just share things I am learning as a mom, along with the usual food, garden, home, etc type stuff. From time to time, I will share some fun things that we've discovered but since I have found that I can get easily bogged down by reading other homeschooler's blogs, I won't go there often.
What I will do, is share this super cute Pinterest project (one of few I managed to do this summer) that I did with my boys to celebrate the Fourth.
Aren't they cute!? We did their handprint with blue fabric paint and I painted the stripes in red with a sponge brush. In hindsight, I think I would've done grey shirts...they don't stay white long! (: We were sure to put their names and the year on them too, so someday, when I make them t-shirt quilts, I can add these little cuties to it.
Happy Back-to-School, whatever that may look like for you and your family! Have a great year!!
"She sets about her work vigorously; her arms are strong for her tasks." -Proverbs 31:17
Every day I do a little cooking, loving, playing, praising, crafting, praying, and learning as I "Rain" it all in.
Monday, July 29, 2013
Thursday, April 11, 2013
Floor Mopping Lessons
Today, as I contemplated use of duct tape on my whining boys (just kidding, I'd never do it, but it's awfully tempting!), I had the bright idea to burn off a little of my frustration with some housework. This way, I could burn calories doing something that needed to be done and possibly not be quite so annoyed with all the whining going on in my house. The changing-by-the-minute Oklahoma weather decided to turn back to winter yesterday and the penned up boys were beginning to revolt!
The oldest was chomping at the bit and hounding me to help me do something today...in between whining about his brother. He is used to helping out with particular things like vacuuming, putting away his clothes, making his bed, and feeding the dog, amongst a few other things, but today, he wanted to be doing whatever I was doing. I gratefully obliged and he helped declutter and entertain his little brother while I swept so we could then mop. That part went smoothly enough.
Then the magic happened....
I gave him a damp mop rag and away he went! Then the little one wanted to join in, but he only wanted to wash his cars and wipe the small tables, so I let him have at it. Who am I to turn down some help with housework and my boys wanting to be clean!?? As it turns out, this whole helping idea was rather great! You see, they were so busy helping that they forgot to be annoyed and pestered by ea ch other and they focused...yes, FOCUSED (with boys of 5 and 2 this is rare!)...on their little jobs. Not only are they learning about helping around the house, they are learning to finish a job, do a job well, listen for directions, focus on the task at hand, do their work cheerfully, and take pride in their work.
I pray that someday, their future wives will be thankful I taught their husbands to be helpful around the house. I thank God that He is teaching me that even the small, seemingly mundane and insignificant things can be used to teach my boys life lessons and guide them towards Him. I pray I can be as cheerful and willing in the purpose He has for me, as my boys are in the jobs I have for them.
The oldest was chomping at the bit and hounding me to help me do something today...in between whining about his brother. He is used to helping out with particular things like vacuuming, putting away his clothes, making his bed, and feeding the dog, amongst a few other things, but today, he wanted to be doing whatever I was doing. I gratefully obliged and he helped declutter and entertain his little brother while I swept so we could then mop. That part went smoothly enough.
Then the magic happened....
I gave him a damp mop rag and away he went! Then the little one wanted to join in, but he only wanted to wash his cars and wipe the small tables, so I let him have at it. Who am I to turn down some help with housework and my boys wanting to be clean!?? As it turns out, this whole helping idea was rather great! You see, they were so busy helping that they forgot to be annoyed and pestered by ea ch other and they focused...yes, FOCUSED (with boys of 5 and 2 this is rare!)...on their little jobs. Not only are they learning about helping around the house, they are learning to finish a job, do a job well, listen for directions, focus on the task at hand, do their work cheerfully, and take pride in their work.
I pray that someday, their future wives will be thankful I taught their husbands to be helpful around the house. I thank God that He is teaching me that even the small, seemingly mundane and insignificant things can be used to teach my boys life lessons and guide them towards Him. I pray I can be as cheerful and willing in the purpose He has for me, as my boys are in the jobs I have for them.
Monday, March 18, 2013
Baby Blankies


Since it seems that half the women I know are having babies lately, I decided I would make some homemade and useful baby gifts. Thanks to some suggestions and searching on Pinterest (of course), I found these super cute car seat blankets! I made flannel and reversible cotton fabric ones with no batting in them for spring and fall type weather.
I hope Momma's and babies both love them as much as Bear and George!
Egg-cited
To tell you the truth, I wasn't quite sure that either of my boys would be all that interested in coloring Easter eggs this year, but to my suprise, both of them seemed extremely enthused about it once we got started. My mother-in-law was really excited to color eggs with the kids, so we went a little overboard on which kit and methods to use, so after our little egg trials, I can now tell you that I will probably NEVER do the dye cup method ever again!We did the Rainbow Eggs (these are the purple and one bright red one...we broke a few shells, by the way) and we loved it! It was super easy, very little mess, and it was fun because the kids could squirt it and see the eggs turning color immediately unlike the dye cups that take 10 minutes for any color! Mom-n-law made hand painted "candy apple" eggs that were shiny...pretty but not for kiddos. My five year old discovered this package of q-tip looking things that were actually swabs that you can paint the dye on the eggs with....LOVED these!! They are Paas brand and easy for both the kids (and Mom) to use. Also, with the non-soaking methods, the idea of the dye not soaking completely through the egg is nice if you'd like to use them for deviled eggs or something later and don't want them to be colored.
Since it's spring and the weather changes quickly, I recommend doing eggs on a rainy or cold day, like we did. We didn't feel bad about being in the kitchen for a while since it was too drizzly and cold to be out in the yard! Our Easter plans are to have a family meal after church and enjoy time together while remember the reason for Easter...the Risen Savior! Enjoy your eggs and enjoy your Easter!
Wednesday, September 26, 2012
Pack a Picnic
Since the weather is getting cooler and it's actually bearable to be outside, it seems fitting to talk about picnics. My kids love going to parks and love picnics. Some days, when we are running errands, we will get our favorite fast food meal and take it to the park if weather permits.
After taking a long road trip to Wyoming (from Oklahoma), I was eternally grateful to my dear Mamaw for teaching me how to pack a picnic cooler and supply box for a long trip so you can have a meal anywhere.
The trick is to make sure you have everything you need for a successful picnic within reach. I packed a small ice chest...not too small but not a big rectangular one either...a small one with a handle that you can easily take out of the car if you need to.
Next, you need a plastic storage box with a lid...depends on how much you are taking with you....we took a rather large one since we were gone for a week, but we didn't pack it too heavy.
Obviously, all your cold stuff will go in the cooler: drinks, lunch meat, cheese, mayo, fruit (if you like it cold), veggies, any dressings you want, etc.
Now, for your plastic box:
Snacks, bread, chips- don't forget to put bread on top!
Plates, cups, utensils (we used plastic and paper but you could do reusable, too)
A sharp knife- we had fruit and veggies that needed cutting
Sheet or table cloth- sheets take up less room and are great for tables or ground
Hand sanitizer and/or baby wipes for before and after!
Paper towels or napkins
When traveling with kiddos, I put in a couple of extra cups with lids, too!
What else would you take??
Monday, August 13, 2012
Cook Ahead Dinner
I know this whole "cooking ahead" idea is not a new one, but I 've never really jumped on the band wagon until now. Now, I don't care to cook and freeze a month of meals all at once...partly because I don't have that big of a chunk of time, and partly because I might want to change it up and not be so tied to what I've made. So, I decided to try this out. I made four days of meals (or parts of the meal) in one evening as I made dinner.
Here was my menu:
1. The night I cooked, I made homemade pizza
2. Beef Stroganoff- I made just the beef mixture and froze it so I could thaw and make noodles quickly
3. Soup- just some simple beef and veggie soup, all prepared, just need to add water and cook
4. Mini cornbread casseroles- cornbread mix prepared, cooked ground beef, cheese, corn- made these to go with my beans in the crockpot
I cooked all my hamburger at the same time and just put together some of the meals and voila, it was ready! I have found myself doing this a lot when I do a chicken in the crockpot, too. I plan my meals so I have the meat prepared and can add it to the recipe. It takes a little planning, but it can be done! It makes meal time much more streamlined which is especially helpful when you have little ones like I do, who aren't too patient for their dinner!
Here was my menu:
1. The night I cooked, I made homemade pizza
2. Beef Stroganoff- I made just the beef mixture and froze it so I could thaw and make noodles quickly
3. Soup- just some simple beef and veggie soup, all prepared, just need to add water and cook
4. Mini cornbread casseroles- cornbread mix prepared, cooked ground beef, cheese, corn- made these to go with my beans in the crockpot
I cooked all my hamburger at the same time and just put together some of the meals and voila, it was ready! I have found myself doing this a lot when I do a chicken in the crockpot, too. I plan my meals so I have the meat prepared and can add it to the recipe. It takes a little planning, but it can be done! It makes meal time much more streamlined which is especially helpful when you have little ones like I do, who aren't too patient for their dinner!
Wednesday, August 8, 2012
I haven't forgotten.....stay tuned!
It's been a crazy summer! We've had lots of fun here and it's now time to get back in the swing of things. I will be back to posting some recipes I've tried and some other fun stuff soon, so stay tuned!
Wednesday, June 27, 2012
Car Emergency Kit
This is a ___ project....if you said Pinterest, you get a cookie! Just kidding about the cookie, but it is a little something I found on Pinterest, where I find most of the things I do. I tweaked it for what I needed in my car.
There's still a little room in my box in case I think of something else tiny that might be useful to have on hand. This handy little box and fit under a seat or easily in a floorboard or trunk. Just be sure when it's 2000 degrees outside that you don't have anything in there that might melt!
Pinned from Rips in My Jeans
Use and empty wipes box or shoebox to store your kit and put in it things that you might need while out and about. Notice, I don't have any wipes in my kit....that's because I carry around a package with me already with two small kiddos, along with a backup diaper or two just in case.
Here's what's in my box:
2 sandwich zip bags
mini lint roller
small first aid kit- bandages, ointment, alcohol wipes, a few Benadryl
Tyenol
Tissues
Lotion
Shout wipes
Small sewing kit- has tiny scissors, needle, thread, safety pin, etc
Hand sanitizer
Bug repellant
Pen and notepad
Hair elastics
There's still a little room in my box in case I think of something else tiny that might be useful to have on hand. This handy little box and fit under a seat or easily in a floorboard or trunk. Just be sure when it's 2000 degrees outside that you don't have anything in there that might melt!
Pinned from Rips in My Jeans
Oreo Cheesecake Cookies....Oh. My.
Again, the Pinterest bug has bitten me and I was spurred to try something new and I swear I ate an entire batch of these, they were sooooooo yummy!
OREO CHEESECAKE COOKIES
Yield: About 1 dozen cookies (mine made about 1 1/2 dozen, as I used around 1 inch balls of dough)
½ cup unsalted butter, at room temperature
3 ounces cream cheese, at room temperature
1 cup granulated sugar
1 teaspoon vanilla extract
1 cup all-purpose flour
½ cup mini chocolate chips (I didn't have minis so I left these out)
1 cup Oreo cookie crumbs
1. Preheat oven to 375 degrees F. Line a baking sheet with parchment paper (this is important! I was out of parchment and my cookies got a little overcooked on the bottom, I think the Oreo crumbs cooked quickly on the hot baking sheet and caused this) and set aside.
2. In a mixing bowl, cream together the butter and cream cheese on medium speed until smooth and well-combined.
3. Add the sugar and vanilla extract and mix until the ingredients are well-combined. Add the flour and mix on low until the flour is incorporated. Stir in the mini chocolate chips with a rubber spatula.
4. Place the Oreo cookie crumbs in a small bowl. Scoop the cookies into about 1½ to 2″ balls (the dough will be soft, don' t worry if it doesn't scoop into a well-formed ball, the crumbs will help hold it together) and then roll in the cookie crumbs. Place the cookie balls on the baking sheet. Bake for 12 to 15 minutes, or until the edges are golden and the tops are slightly puffed.
5. Cool on the pan for 2 minutes before transferring to a wire rack to cool completely. Store in an airtight container.
Recipe Pinned from Collecting the Moments (other sources on this blog for this recipe)
Tuesday, June 19, 2012
Summertime Updates & Fun Stuff
Since summer is in full swing now, it's a little crazy and harder for me to have time to blog without someone attached to my leg, so there will be a few less, but I am trying to keep up with garden updates, tips, etc. and some recipes. Recipes are lacking a little, as well, since I don't do as much cooking when hubby works out of town.
BUCKET LIST:
Our Summertime Bucket list is coming along quite nicely. We have managed to do about seven things...some small, some not small, but we are having fun!
GARDEN:
Wow! The garden has started to take off!! I have found some things that work well and some that don't. My latest and possibly greatest discovery, is the use of some weird stuff called diatamaceous earth . As with any garden that is producing, the more you produce and start yielding good stuff, the more the critters like it too! When squash bugs threatened to take over last week, I had to find an alternative to the time consuming method of picking them off....who has time to do that!?!?....or nasty chemicals that would be dangerous for my kiddos and pet, not to mention the environment. So, with the handy dandy google search, I found it!! This crazy stuff that dries up/scratches the little buggers but is safe for humans, even to eat it and is used in organic gardening! Hallelujah!! So far, so good on getting rid of the squash bugs. I will have to keep on top of them if I plan to plant pumpkins in a week or two.
I have to post something yummy to try, so here you go--my husband loves squash cooked this way and you can even add other stuff to make it to your taste:
2-3 yellow squash/ zucchini chopped
1 small chopped onion
1 egg
Flour to coat
Salt and pepper
Coat squash with egg in a bowl, then in same bowl, add enough flour to coat it again. Add chopped onion and mix in. Heat oil in skillet then add the squash mixture, salt and pepper to taste, and fry it up to your desired crispiness! Enjoy!!!
Thursday, May 24, 2012
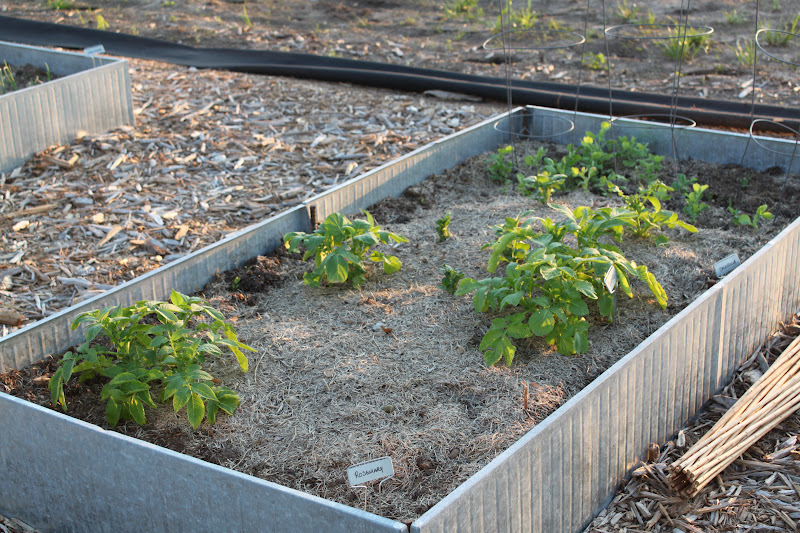
Garden Update
| Raised beds...potatoes in front are growing nicely, but the peas may burn up soon. |
This is the other side of my garden, where there are no beds yet. My plan is that next year, I have at least two or three more raised beds or bordered planting areas.
| I love my tractor tire flower bed (: |
| Sunflower bed....going to have a ton soon! |
| The first of my sunflowers |
Monday, May 21, 2012
Bubble Mania
Kids love BUBBLES! I decided to try my hand at making my own bubbles and I found this cute idea for a bubble refill container on Pinterest. I can't even remember where I found the recipe, but it works great!
I made the recipe times four to fill my container, but to make a single batch use:
1 cup water
4 Tbsp. Dawn or Baby bath--I used baby bath so it won't sting eyes
2 Tbsp. light corn syrup
This will make a TON of bubble for CHEAP!!
I had a few frosting containers that I'd saved, because I just couldn't bring myself to throw them away, I knew they'd be handy for something and sure enough! They are great for filling with bubble and holding the bubble wands!
I thought this would be really fun since we have friends visiting with their kids this weekend and will save me from having to refill little bubble trays all the time! I can't wait to see how the kids like them!
Made in the Shade
We live in the country. We live in a barn...for real...well, sort of anyway. We have a huge metal shop building with 3/4 of it as my husband's business and the rest is our house. I know...sounds a little weird, but when you are in my house, you don't know it's inside a shop. Anyway, one of the things that we did not do when we built, was build a porch for our house. Mostly because we had originally thought that we would build a house separate from the building and we didn't want to spend the extra at the time. Now, we have decided we kind of like the idea of staying where we are and adding on a porch, maybe an extra bedroom later, those sorts of things.
Anyway, to make a long story a little shorter, we have a ginormous playhouse that my husband built for our kids (only one kid then) when we moved in three years ago and it is the only place that we could even begin to shade until we add on the metal porch (which is, if you know anything about metal buildings, not a cheap endeavor). Yes, we have trees....small trees that hope to grow up someday. And, the east side of our building does not have a door from the house to it nor is it in the fenced yard.
We'd talked about using the space under the playhouse as a patio area....only problem is that the most open side of it faces west, which as you may know, is the hottest direction to be facing on a summer evening.
So, armed with a cordless drill borrowed from my neighbor (who lives 1 1/2 miles away), some laundry line rope, hooks, two fabric shower curtains, and 20 drapery ring clips, I went to work to make a shade that could be pulled back or taken down easily if needed.
Here's what happened:
This is before I started...I didn't even pick up the Tonka trucks (:
Since I was being "She-Woman" and doing this by myself, there are not lovely pictures of me trying to hold a huge DeWalt cordless drill on a step stool above my head to do this...that was the hardest part of the job.
Looks a little like actual outdoor curtains, but WAY cheaper....the entire project only cost around $50 and half that was the shower curtains. The only thing I need to do now, is figure out a way to weight the bottom because we live in "Oooooooklahoma, where the wind comes sweeping down the plain...." and whips around everything in it's path!
Anyway, to make a long story a little shorter, we have a ginormous playhouse that my husband built for our kids (only one kid then) when we moved in three years ago and it is the only place that we could even begin to shade until we add on the metal porch (which is, if you know anything about metal buildings, not a cheap endeavor). Yes, we have trees....small trees that hope to grow up someday. And, the east side of our building does not have a door from the house to it nor is it in the fenced yard.
We'd talked about using the space under the playhouse as a patio area....only problem is that the most open side of it faces west, which as you may know, is the hottest direction to be facing on a summer evening.
So, armed with a cordless drill borrowed from my neighbor (who lives 1 1/2 miles away), some laundry line rope, hooks, two fabric shower curtains, and 20 drapery ring clips, I went to work to make a shade that could be pulled back or taken down easily if needed.
Here's what happened:
This is before I started...I didn't even pick up the Tonka trucks (:
Since I was being "She-Woman" and doing this by myself, there are not lovely pictures of me trying to hold a huge DeWalt cordless drill on a step stool above my head to do this...that was the hardest part of the job.
Looks a little like actual outdoor curtains, but WAY cheaper....the entire project only cost around $50 and half that was the shower curtains. The only thing I need to do now, is figure out a way to weight the bottom because we live in "Oooooooklahoma, where the wind comes sweeping down the plain...." and whips around everything in it's path!
Thursday, May 3, 2012
Make Your Own Pizza Pockets
Believe it or not, this is my own concoction! I'm sure there is a recipe for this out there somewhere, but I was improvising and came up with this quick, easy dinner idea- Pizza Pockets!
Ingredients:
1 can refrigerated crescent rolls
2 oz. shredded part skim mozzarella
1/4 cup pizza sauce
2 oz slice ham
Desired amount of Italian seasoning
Heat oven to 375. Roll out crescent dough and take apart in quarter sections (two triangles together). Put about a tablespoon (give or take--to your taste) of pizza sauce on one end of the rectangle, then top with about 1/8 cup of cheese and 1/2 a slice of ham. Then fold over and press edges, then bake according to crescent directions, roughly 13-15 minutes-- Makes 4
*11 WW Pts. Plus each
*You can add veggies, different meat, different cheese- whatever pizza toppings you want--just make a pocket out of it!
BIG hit with the kiddos!!
Ingredients:
1 can refrigerated crescent rolls
2 oz. shredded part skim mozzarella
1/4 cup pizza sauce
2 oz slice ham
Desired amount of Italian seasoning
Heat oven to 375. Roll out crescent dough and take apart in quarter sections (two triangles together). Put about a tablespoon (give or take--to your taste) of pizza sauce on one end of the rectangle, then top with about 1/8 cup of cheese and 1/2 a slice of ham. Then fold over and press edges, then bake according to crescent directions, roughly 13-15 minutes-- Makes 4
*11 WW Pts. Plus each
*You can add veggies, different meat, different cheese- whatever pizza toppings you want--just make a pocket out of it!
BIG hit with the kiddos!!
Tuesday, April 24, 2012
Summer Bucket List
After searching Pinterest and online for summertime "bucket list" ideas, I was inspired to make my own list.
Just a word of advice, though- if you search online, you will most likely become completely overwhelmed and feel that you are lacking in every area of your life because the woman with the perfect website or blog makes you want to puke on her perfect little picture because she can do nine thousand things with her ten kids in tow and still look super model-ish and unstressed as she tells you her latest homemade accomplishment ....whew...glad I got that out!
Anyway, the point is, that there is no right or wrong when it comes to your list and we can't do it all, contrary to popular belief (and all those cool blogs we come across--yes, I am guilty of feeling guilty, too!). So choose things that are meaningful to you and your own family. Also, be sure these are things that are realistic and doable for your family.
Take into consideration these tips when you make your list:
I am already beginning to think that the benefits of doing the things on our list, will be that I can pass on wisdom to my children as we do things, they might accidentally learn something, the physical activity, the quality time together, and the memories we will be making. Don't forget to take pictures so you can remember your summer! One fun idea would be to take pics of each thing you do and make a bucket list photo book that your family can enjoy forever (and don't worry about this one...that's what all those cool photo sites are for-you can add pics and make a photo book without craft skills!)
Enjoy making your list! Here's mine- hope it inspires you to make your own with your family!!
Just a word of advice, though- if you search online, you will most likely become completely overwhelmed and feel that you are lacking in every area of your life because the woman with the perfect website or blog makes you want to puke on her perfect little picture because she can do nine thousand things with her ten kids in tow and still look super model-ish and unstressed as she tells you her latest homemade accomplishment ....whew...glad I got that out!
Anyway, the point is, that there is no right or wrong when it comes to your list and we can't do it all, contrary to popular belief (and all those cool blogs we come across--yes, I am guilty of feeling guilty, too!). So choose things that are meaningful to you and your own family. Also, be sure these are things that are realistic and doable for your family.
Take into consideration these tips when you make your list:
1. The ages of your children- this one is self explanatory, you want things to be age appropriate
2. Your summer schedule- for example, my husband is crazy busy at work and does weird night hours in the summer, so he is out for lots of things or we have to do them on the weekend
3. Your geographic area -we live in a small town, 25 miles plus from lots of things to, so I wanted to be sure we added lots of things to do at home or very close
4. Your summertime budget-every mom knows you don't want to break the bank for a fun summer so
keep your budget in mind when you make the list
5. Ask your children what they'd like to do-I've been asking my four year old what he'd like to do this summer and he is already excited about doing many of the things on our list
I am already beginning to think that the benefits of doing the things on our list, will be that I can pass on wisdom to my children as we do things, they might accidentally learn something, the physical activity, the quality time together, and the memories we will be making. Don't forget to take pictures so you can remember your summer! One fun idea would be to take pics of each thing you do and make a bucket list photo book that your family can enjoy forever (and don't worry about this one...that's what all those cool photo sites are for-you can add pics and make a photo book without craft skills!)
SUMMER
BUCKET LIST
o
Aquarium
o
Zoo
o
Philbrook Museum
o
Woolaroc
o
Movies
o
Library
o
Cherry Street Farmers
Market
o
Broken Arrow Farmers
Market
o
Picnic
o
Play in sprinkler
o
Blow bubbles
o
Paint outside
o
Sidewalk chalk
o
Make homemade ice cream
o
Swimming
o Obstacle
course
o
Treasure Hunt
o
Air & Space Museum
o
Camping
o
Visit a children’s
museum
o
Visit a natural history
museum
o
Go to a Pick-Your-Own
farm
o
Make garden stepping
stones
o
Make popsicles
o
Go to the Lake
o
Nature Center
o
Make butter
o
Mini golf
o
Go fishing
o
See some fireworks
o
Shade for under
playhouse for table and sandbox
o
Incredible Pizza
o
Plant pumpkins &
work in garden
o
Catch fireflies in a
jar
Labels:
activities,
bucket list,
budget,
crafts,
family,
fun,
homemade,
kids,
memories,
photos,
summertime
Friday, April 6, 2012
Spring Garden
My garden is a work in progress. Lots of people have the problem of not enough space...me, I have the opposite problem....there is so much space that I want to fill with beautiful garden that I don't have the time, money, or energy to do it all at once. So, I am taking baby steps.
This year, I managed to convince hubby to let me have some raised beds instead of trying to take care of an enormous, spread out area. I wanted things more concentrated to help reduce weeds and make it, well, prettier.
I am trying out a method that is new to me (mostly since I haven't had a ton of gardening experience) but actually a method that has been used probably since the beginning of time....companion gardening.
It's suprisingly simple really. It's just a matter of sorting and planning. As you can see, my garden is just beginning to grow, but I am looking forward to seeing what happens!
Next year, I am definitely adding strawberries and some other perennial fruits and vegetables. After that, in the next few years....rock paths, arbors, sitting area, expanding my perennial flower garden, a little garden shed/greenhouse......aaaaah....I can see it now.....and my kids will grow and help...and hopefully, enjoy the garden as much as I do! There is so much to be learned there, as well!
This year, I managed to convince hubby to let me have some raised beds instead of trying to take care of an enormous, spread out area. I wanted things more concentrated to help reduce weeds and make it, well, prettier.
I am trying out a method that is new to me (mostly since I haven't had a ton of gardening experience) but actually a method that has been used probably since the beginning of time....companion gardening.
It's suprisingly simple really. It's just a matter of sorting and planning. As you can see, my garden is just beginning to grow, but I am looking forward to seeing what happens!
Next year, I am definitely adding strawberries and some other perennial fruits and vegetables. After that, in the next few years....rock paths, arbors, sitting area, expanding my perennial flower garden, a little garden shed/greenhouse......aaaaah....I can see it now.....and my kids will grow and help...and hopefully, enjoy the garden as much as I do! There is so much to be learned there, as well!
World Vision Update
So.....we finally (a couple weeks ago) managed to raise our $100 for our World Vision gift of two chickens and a goat! This was something my four year old and I started around Thanksgiving and we put in pocket change, a dollar here and there, and he put in lots of his spending money (not just from his giving jar) into the bucket and we did it!!
Now, we have begun a new gift to work on...5 rabbits for $80. The boy is loving this and I love seeing him want to put all the change he can find in the bucket and seeing how fast we can fill it up! I discovered a clean cottage cheese container with a slot in the lid is a great way to do this because you can count it periodically and when you do lots of change like we do, you can take the whole thing to be cashed in when it's full and put the cash back in it right then. We put a picture of the rabbit on the container just like we did the goat and chicken one and we are all set!!
Also, World Vision will send you a card with a picture representing the gift you gave.
Now, we have begun a new gift to work on...5 rabbits for $80. The boy is loving this and I love seeing him want to put all the change he can find in the bucket and seeing how fast we can fill it up! I discovered a clean cottage cheese container with a slot in the lid is a great way to do this because you can count it periodically and when you do lots of change like we do, you can take the whole thing to be cashed in when it's full and put the cash back in it right then. We put a picture of the rabbit on the container just like we did the goat and chicken one and we are all set!!
Also, World Vision will send you a card with a picture representing the gift you gave.
A Little Spring Cleaning Idea....Kids' Nook
| Before |
So, my "office" is in the corner of our living room (which is one huge open area...living, dining, kitchen), and they like to play right by me when I have some work do to. I needed to do a deep clean on the area anyway...you know, clean all the dust bunnies out really good from under and behind the desk and untangle all the wires, not to mention straighten up the top of the desk.
| After |
I decided to turn the printer cabinet the other direction at the end of the desk, move the desk down a few inches and there was room for a little nook!
I eventually want to make this cool little couch made out of all sorts of pillows (or at least find a little small couch or cute armchair to replace Spidey), but for now, stuffed animals, Spiderman chair, and a few random pillows from the kids' room are a big hit!
Wednesday, March 21, 2012
Skinny Monkey Cookies
This was a Pinterest find and I tried them out today. I would like them a tad bit sweeter, but for about 50 calories each, I can't complain and they have some really good stuff in them! Hope this helps me quench some sweets cravings!!

Nutritional Information:
47 calories; 7.5 g carbs; 1.6 g fat; 1.5 g protein; 1.3 g fiber; 1 WW PointsPlus
Recipe source
Ingredients:
- 3 bananas
- 2 cups old-fashioned oats
- 1/4 cup creamy peanut butter
- 1/4 cup unsweetened cocoa powder
- 1/3 cup unsweetened applesauce
- 1 tsp. vanilla extract
- Dash of cinnamon (optional)
Directions:
Preheat oven to 350°F. Mash bananas in a large bowl, then stir in remaining ingredients. Let batter stand for approximately 20 minutes, then drop by teaspoonfuls onto ungreased cookie sheet. Sprinkle with cinnamon if desired. Bake 10-12 minutes.Freezing Directions:
Cool completely, then place cookies in a freezer bag. Seal, label, and freeze.Nutritional Information:
47 calories; 7.5 g carbs; 1.6 g fat; 1.5 g protein; 1.3 g fiber; 1 WW PointsPlus
Recipe source
Subscribe to:
Posts (Atom)